Pwner Beginner - An Introduction On How To Start Pwn Challenges
Introduction On How To Solve Pwn Challenges
Background Story
So, I started to gain interest in pwn challenges when I saw one of my team-mate (4n0nym4u5) solving a pwn challenge from pwnable.tw. I didn’t understand a bit but there was this urge in me trying to understand what he was doing. I was able to deduce this much :
- He was writing an exploit in python using
pwntools(I noticed it because X3eRo0 instroduced me to this during r2con) - He was continuously using PwnDbg for that (I saw GEF being used in some of the writeups)
- He was re-running his exploit again and again, maybe to debug it.
- It was awesome and felt like real hacking!
So, the next day I tried searching on how to start binary exploitation and I found almost nothing that helped me (maybe I was impatient or something but I really didn’t find it). I thought maybe trying to solve a real challenge help me learn so I downloaded the start challenge from pwnable.tw. That didn’t help either. I tried reading writeups about it but that didn’t help either mainly because by conscience wasn’t allowing it because maybe by reading the solution I’ll destroy my chance of learning it.
You can see the solution, understand the solution, but never understand the concepts. You can understand the concepts only if you solve it on your own!
After a few days I was frustrated and directly asked 4n0nym4us how to begin binary exploitation.
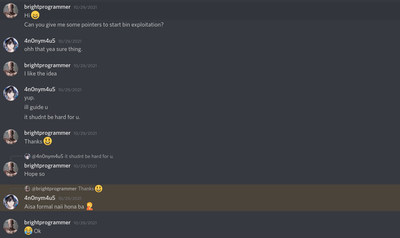
Then he asked me some questions to know how much I already know and then the next day in approximately 2hrs video session he taught me many concepts :
- Security permissions in binary like what NX, RelRO etc… meant
- How buffer overflow actually works
- How to write payloads
- How to write your own shellcodes
- Some basic intro to PwnDbg
- How things work with
ALSR(Address Space Layout Randomization) and withoutASLR - Return Oriented Programming (ROP), building ROP chain etc…
- Return
libc(all C/C++ programs link to it) - Return to
csu(a function found in all C/C++ programs) - How things work when
NX(No eXecute) is enabled and when it is disabled. - How to make the program leak some important memory address
- GOT (Global Offset Table) overwrite
- Partial overwrite on GOT
The list is huge and I regret not recording the session, so, I want to revise everything I learnt in that video and because of that I’m motivated to write this post. Hope this helps you too.
Some Pre-Knowledge
In cybersec you will hear/read the words vulnerability and exploit in most of the related resources. A vulnerability is something that you exploit. An exploit is the algorithm or method that you use to do some things that the developer didn’t expect you or anyone to do. For example, you are connected over some server that asks you to enter your name and instead you write something that gives you access to the shell on that server. Since you have access to a remote shell, you can theoretically do almost anything with that server! shut it down, restart it, gain root privileges, get access to some confidential data etc! All of this because you exploited a vulnerability! and this is what real hacking looks like!
Before beginning, you must know how to read assembly code! alteast a little bit. Because sometimes, these programs aren’t written in C/C++ that a decompiler can easily understand. They are sometimes written pure assembly. Your decompiler can recognize some stuffs but not all of it! not matter how good it is!
You must know what an ELF file is. If you need an intro to ELF files, you can refer to my notes here.
The Real Stuff
So, in this part we’ll only see different ways to exploit stack. There are two ways in which memory can be allocated in a program :
- The Stack (volatile)
- The Heap (non volatile)
Both can be exploited but here we’ll see only how to exploit the stack because that’s what I learnt and what I know at the moment.
What is The Stack?
Stack is usually referred to a data structure that is LIFO (Last In First Out) type. In context with memory allocation, stack is a memory region assigned to each program while being loaded by the operating systems that is used like a stack data structure. When you allocate space without using functions like malloc, calloc, new etc…, you allocate them on the stack. See some examples below :
// includes
.
.
.
// this int is not in the stack, this is stored in $rax
int main(){
    .
    .
    .
    // all these variables are allocated on the stack
    int x;
    float y;
    double z;
    uint8_t[1024] buffer;
    char[256] input;
    .
    .
    .

    // all these variables are allocate on the heap
    char mem = (char*)(malloc(0x400)); // allocate 1024 bytes
}
.
.
.
The stack is actually common for each function, it is just a plain contiguous memory space like any other! but then what makes us think that stack is separate for each function? This is an illusion created by the compiler in the assembly level and this is where the stack canary comes into play.
It is called a canary because of the use of canary birds in the mines before. Miners used to take canary birds in cages and go into the mine. A mine sometimes contains poisonous gases and when a canary stopped screaming then they understood that this area is poisonous and they get out of there. Sometimes the canary even died!
The stack canary fullfills a similar purpose! In the beginning of a function, just after function epilogue, a secret value is stored on the stack that is different for every function and at the end, just before epilogue, this value on stack is matched with the special value and if it’s not same then this means that there was an overwrite and the program exits with a stack overflow error.
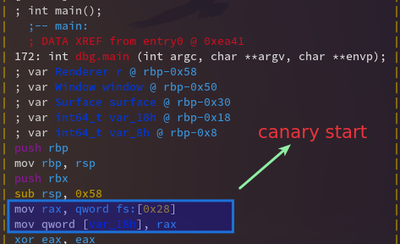
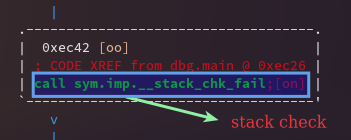
This is dynamically linked executable, so, the actual stack check code isn’t here but usually it’ll roughly look something like this :
; our stack check
stack_check_fail :
    mov rax, qword [var_18h] ; get the magical value in rax
    cmp rax, qword fs:[0x28] ; check the magical value
    jne stack_fail           ; if fails then exit

; calls exit with segfault code
stack_fail:
    mov rdi, SIGSEGV         ; segmentation fault
    call sys.imp.exit        ; call exit
If this canary is absent (can be turned off during compilation) then you can easily overwrite the whole stack! well there are some other constraints too to be honest which we’ll see in this post.
How The Stack Works
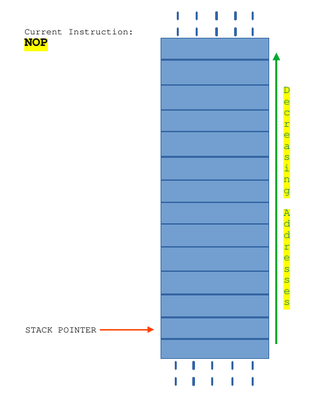
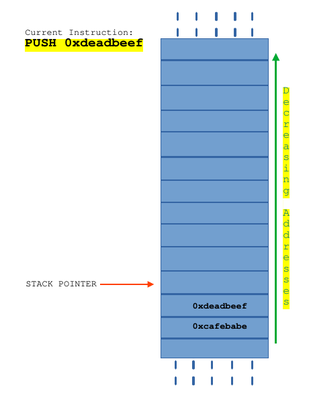
You have push and pop instructions in assembly to save and get data from the stack (the memory region). When a push instruction is executed, the data passed as second operand is stored in the memory region pointed by stack pointer and it is decremented by one, so that when a next push instruction is executed, it is pushed to memory region one more than previous one. When a pop instruction is executed, data stored in the memory region pointed by the stack pointer is stored in the given operand and stack pointer is incremented by one.
Let’s say the next instruction to be executed is NOP, then after execution the stack will look something like this :
The next instruction is a push instruction which will save the operand on the stack. When I say on the stack, I refer to the idea that stack pointer is the top of stack and the value being pushed is stored there.

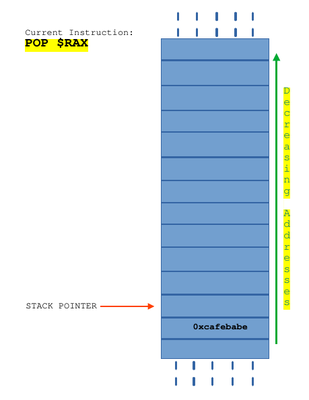
This last instruction will pop a value from the stack and store it in $RAX.
How The Stack Works In A Function Call
Here I’ll consider a program where canary is disabled.
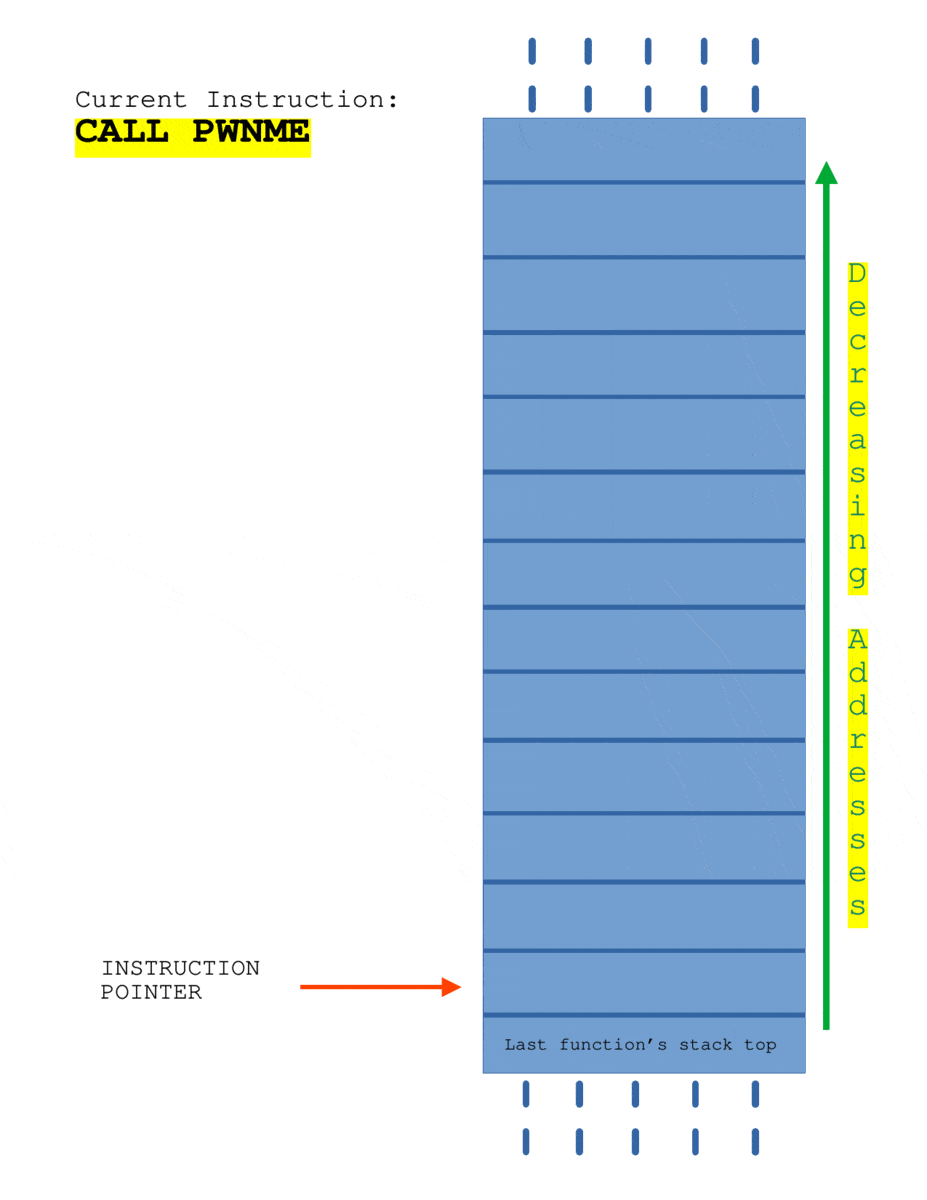
The SUB RSP, 0x10 is allocating 16 bytes buffer on the stack. When the instruction CALL PWNME is executed, the current $RIP is pushed onto the stack automatically and when the control flow reaches the function PWNME, PUSH $RBP is called to save the begin address address of stack of caller function. Later, when RET instruction is executed, the value of $RIP is popped from the stack and $RSP get’s adjusted to the top of stack frame of caller function automatically.
How Data Is Written To A Memory Location
Before understanding stack overflow, you must first understand the write direction when a program is taking input. When program starts taking input and the buffer address is say 0x0000, it takes first character input, then it will be written at address 0x0000, for second character, the write address will be 0x0001, for 10th character, the write address will be 0x0009. Say we’re writing the string “aaaa….aa” to the buffer then it’ll be written like this :

Stack Overflow
The term stack overwrite is a better and more precise term for this according to me because what you basically do is overwrite more than what was needed. But then the question comes : How do we overwrite the stack? You can only overwrite the stack if the program takes input in a buffer allocated onto the stack and doesn’t keep check of the input size.
Say, the program is doing a read to a buffer syscall. The buffer size to be read is 0x20 and the read size is 0x30, then we can basically just write 0x30 bytes onto the stack! it doesn’t matter what the size of buffer is!
![taken from tenor[dot]com](/post/pwner-beginner-an-introduction-on-how-to-start-pwn-challenges/amazing-gif.gif)
What Is The Vulnerability Here?
As we saw, the instruction pointer is saved on the stack and when return is called, the program jumps to that instruction address. We also saw that we can overwrite the stack if allowed to do so. This means we can overwrite the stack where the return address is stored! This means we can control the execution flow! This is a very big vulnerability in itself.
![taken from tenor[dot]com](/post/pwner-beginner-an-introduction-on-how-to-start-pwn-challenges/mind-blown.gif)
How do we exploit it then?
We exploit this by writing a playload (basically a string) when the program takes input in such a way that it’ll overwrite the return address with something useful! I’ll use ropemporium’s first challenge. Let’s download x86_64 architecture. We’ll use pwntools to write our exploit.
To generate a base code from where we’ll start building the exploit, let’s create a template using the following command : pwntools-pwn template --host=0.0.0.0 --port=1337 ./ret2win > exploit.py.
This will create a script named exploit.py with the following contents :
#!/usr/bin/env python3
# -*- coding: utf-8 -*-
# This exploit template was generated via:
# $ pwntools-pwn template '--host=0.0.0.0' '--port=1337' /usr/bin/cat
from pwn import *

# Set up pwntools for the correct architecture
exe = context.binary = ELF('./ret2win')

# Many built-in settings can be controlled on the command-line and show up
# in "args".  For example, to dump all data sent/received, and disable ASLR
# for all created processes...
# ./exploit.py DEBUG NOASLR
# ./exploit.py GDB HOST=example.com PORT=4141
host = args.HOST or '0.0.0.0'
port = int(args.PORT or 1337)

def start_local(argv=[], *a, **kw):
    '''Execute the target binary locally'''
    if args.GDB:
        return gdb.debug([exe.path] + argv, gdbscript=gdbscript, *a, **kw)
    else:
        return process([exe.path] + argv, *a, **kw)

def start_remote(argv=[], *a, **kw):
    '''Connect to the process on the remote host'''
    io = connect(host, port)
    if args.GDB:
        gdb.attach(io, gdbscript=gdbscript)
    return io

def start(argv=[], *a, **kw):
    '''Start the exploit against the target.'''
    if args.LOCAL:
        return start_local(argv, *a, **kw)
    else:
        return start_remote(argv, *a, **kw)

# Specify your GDB script here for debugging
# GDB will be launched if the exploit is run via e.g.
# ./exploit.py GDB
gdbscript = '''
continue
'''.format(**locals())

#===========================================================
#                    EXPLOIT GOES HERE
#===========================================================
# Arch:     amd64-64-little
# RELRO:    Full RELRO
# Stack:    Canary found
# NX:       NX enabled
# PIE:      PIE enabled

io = start()

# shellcode = asm(shellcraft.sh())
# payload = fit({
#     32: 0xdeadbeef,
#     'iaaa': [1, 2, 'Hello', 3]
# }, length=128)
# io.send(payload)
# flag = io.recv(...)
# log.success(flag)

io.interactive()
to run this, we can do ./exploit.py LOCAL GDB.
If you want to debug it, set context.terminal with something like this
# which terminal to use
context.terminal = ['xfce4-terminal', '--tab', '-x']
This is for xfce4-terminal to launch a new tab and -x is for executing the command passed to it by pwntools. This will automatically launch a gdb terminal and then you can debug your exploit from there!
Example #1 : ret2win
Let’s try solving a challege as an example
Siddharth Mishra
Computer Science Enthusiast
Building and breaking into systems to learn them inside out!